Checks for setting up poultry house for best brooding
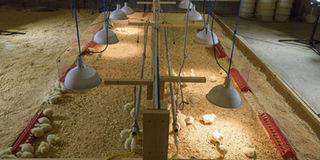
An ideal brooding room. Always ensure that the heat source is working, there is enough charcoal and the house is warmed at least 12 hours before the chicks' arrival. PHOTO | COURTESY
What you need to know:
- Litter management is a crucial aspect of environmental management and correct litter management is fundamental to bird health and performance.
- A good litter must be absorbent, light weight preferably from soft wood, inexpensive and non-toxic.
- The key to successful chicken rearing starts with having a systematic and efficient management programme in place.
- It is important that supplemental feeders should not run empty as this will cause stress on the chicks and reduce yolk sac re-absorption.
There are two ways of setting up a poultry house for brooding depending on environmental conditions and resources available.
• Whole house brooding
In this system the whole house is heated up prior to chicks arrival. It is applied in mild climates and the principle is to maintain the temperatures in the house with minimal fluctuations.


• Partial house brooding
Is commonly practised with attempt to minimise the heating/brooding costs and limited initially to a small portion of the house.
The brooding area will then be increased gradually as the birds grow as soon as possible as long as the desired temperatures are achieved.
It is important to heat the house at least 12 hours prior to arrival of the chicks. Below is an example of partial house brooding for chicks.
• Chicks up to 7 days- ½ of the house occupied
• Eight to 10 days - ½ to ¾ of the house occupied
• 11 to 14 days - ¾ of the whole house occupied
Using used feed bags as curtains, floor to ceiling curtains are used to divide the house. A solid 20cm barrier made of iron sheet or three ply boards should be placed on the floor as a ring in front of the curtain to ensure no drafts disturb the chicks.
Stocking density should not exceed more than 40-60 birds per m2, provide adequate light to attract birds to drinkers and feeders.
Litter Management
Litter management is a crucial aspect of environmental management and correct litter management is fundamental to bird health and performance. Litter should not be re-cycled and must be disposed away from poultry houses, at least 1km a way.
Functions of good litter
1. Absorbs excessive moisture
2. Dilutes chick droppings minimising bird to manure contact
3. Provide an insulation from cold floor temperatures
A good litter must be absorbent, light weight preferably from soft wood, inexpensive and non-toxic. Should be kept dry at all times and wet litter replaced immediately.
I personally discourage removal of all litter for sale when birds are in the units as this practice tends to cause respiratory problems and flare up of coccidiosis in the flock, more so in layer flocks.
Litter alternatives
1. Pine wood shavings – excellent absorptive qualities
2. Hard wood shaving – may be toxic due to tannins
3. Saw dust – not recommended for day old birds due to mould growth
4. Chopped straw – tendency to cake
5. Shredded paper – tendency to cake
6. Rice hulls – good litter alternative
7. Peanut hulls
8. Cane pummage
Pre-placement checklist
The key to successful chicken rearing starts with having a systematic and efficient management programme in place.
This programme must start well before the chicks arrive on site. Pre-placement house preparation as part of management programme provides a basis for an efficient and profitable flock.
The following checks need to be made:
1. Equipment check
After confirming that the equipment capabilities meet the number of chicks to be placed, install the necessary brooding equipment and check that they are functional. Ensure that all water, feed, heaters and ventilation systems are properly adjusted.
2. Brooder checks
Ensure that the heat source is working, you have enough charcoal and the house is warmed 12 hours before chick arrival, check temperatures using thermometer. The floor temperatures should be around 32 degrees celsius.
3. Minimum ventilation check
Ensure the curtain is slightly open on the top to allow removal of waste gasses and excess moisture
4. Drinker check
Ensure 14-16 drinkers per 1000 chicks should be provided within the brooding area of which 8-10 can be bell drinkers.
Check for water leaks, flush the drinker lines, and ensure the heights are at chick level, water must be clean and fresh.
5. Feeder check
Supplemental feeders should be provided for the first 4-5 days in the form of paper, trays or lids. The paper should occupy 65 percent of the floor space. Provide 1 tray for 50 birds.
It is important that supplemental feeders should not run empty as this will cause stress on the chicks and reduce yolk sac re-absorption.
Refresh feeders with new feed three times a day to increase appetite.
Do not place feeders or drinkers directly under the heat source as this will denature the vitamins and reducing water intake.
You should put 50-60 grams of feed per chick on the paper as a start.
Dr Watson Messo [email protected]